> For the complete documentation index, see [llms.txt](https://docs.growthfactor.ai/llms.txt). Markdown versions of documentation pages are available by appending `.md` to page URLs; this page is available as [Markdown](https://docs.growthfactor.ai/getting-started/workspace-settings.md).
# Workspace Settings
Workspace Settings is where each workspace is configured — name and color, members, default search parameters (trade zone, tracked brands, tracked categories), the resources it owns, and the lenses that power its [GrowthFactor Score](/data-and-analytics/growthfactor-score.md). Settings are scoped per workspace, so different teams in your organization can tailor analysis independently.
***
## Opening Workspace Settings
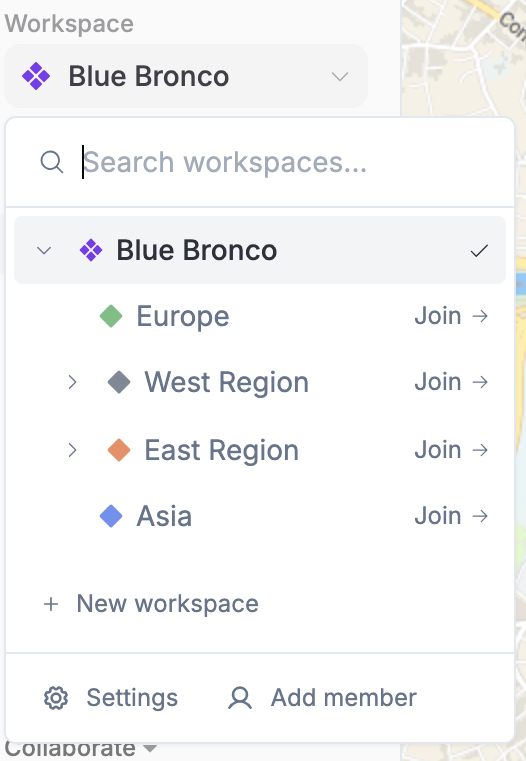
Workspace Settings is admin-only. Click the **workspace name** in the top of the left sidebar to open the workspace switcher, then click **Settings** at the bottom of the dropdown. (Members and Viewers don't see the Settings button — they see a short note pointing them to ask an admin.)
The Workspace Settings dialog opens with the active workspace selected. Use the tree on the left to switch between workspaces — clicking a workspace loads its settings on the right. The tree only shows workspaces you have admin access to.
Each workspace has up to six tabs: **Defaults**, **Members**, **Resources**, **Logo**, **Custom Evaluators**, and **Site Score**. **Custom Evaluators** is an early access beta, and **Site Score** appears only where it's enabled for your organization.
***
## Workspace Header
At the top of the right pane, the selected workspace's name, color, and description are editable inline:
* **Color dot** — click to change the workspace color from the preset swatches or pick a custom hex
* **Name** — click to rename. Name must be unique among siblings
* **Add description** — click to add or edit an optional description
* **Member count** and **sub-workspace count** — quick stats for the workspace
* **Create sub-workspace** — opens the Create Workspace dialog with this workspace pre-selected as the parent
* **Delete** — appears in the top right for any workspace other than the one you're currently viewing. The root workspace and your current workspace cannot be deleted
{% hint style="info" %}
You can also create a new sub-workspace from the **+** button next to "Workspaces" in the left tree, which uses the currently selected workspace as the parent.
{% endhint %}
***
## Defaults Tab
The Defaults tab controls how site analysis runs in this workspace. This includes the default trade zone used for searches, which brands and categories appear on the Tracked POIs map layer, and the demographic variables the workspace reports on.
### Trade Zone
The trade zone defines the geographic area used to calculate demographics and analyze site potential. It's used as the default across your workspace. Each workspace has a single default trade zone.
If none is set, click **+ Add trade zone**. Otherwise the current zone appears as a card. Click it (or the pencil icon) to edit, or the trash icon to remove.
### Tracked Brands
Tracked brands are the specific brands that show up in the Tracked POIs map layer. Each row shows the brand name and its behavior. Click **+ Add brand** to add one, or click a row (or the pencil icon) to edit it; the trash icon removes it. For each brand, choose a behavior:
* **Drawn** — complement brands whose customers are likely to also visit you
* **Avoid** — competitor brands that draw from the same customer pool
* **Neutral** — brands to track on the map without factoring into scoring
### Tracked Categories
Tracked categories let you track entire business categories rather than a specific brand, useful when you want to monitor a type of business. The same Drawn / Avoid / Neutral behaviors apply. Click **+ Add category** to add a new entry.
{% hint style="info" %}
If a tracked brand or category name no longer matches GrowthFactor's data source, a banner appears above the list and the name is highlighted in red. Update or remove it to keep it tracked.
{% endhint %}
### Demographic Variables
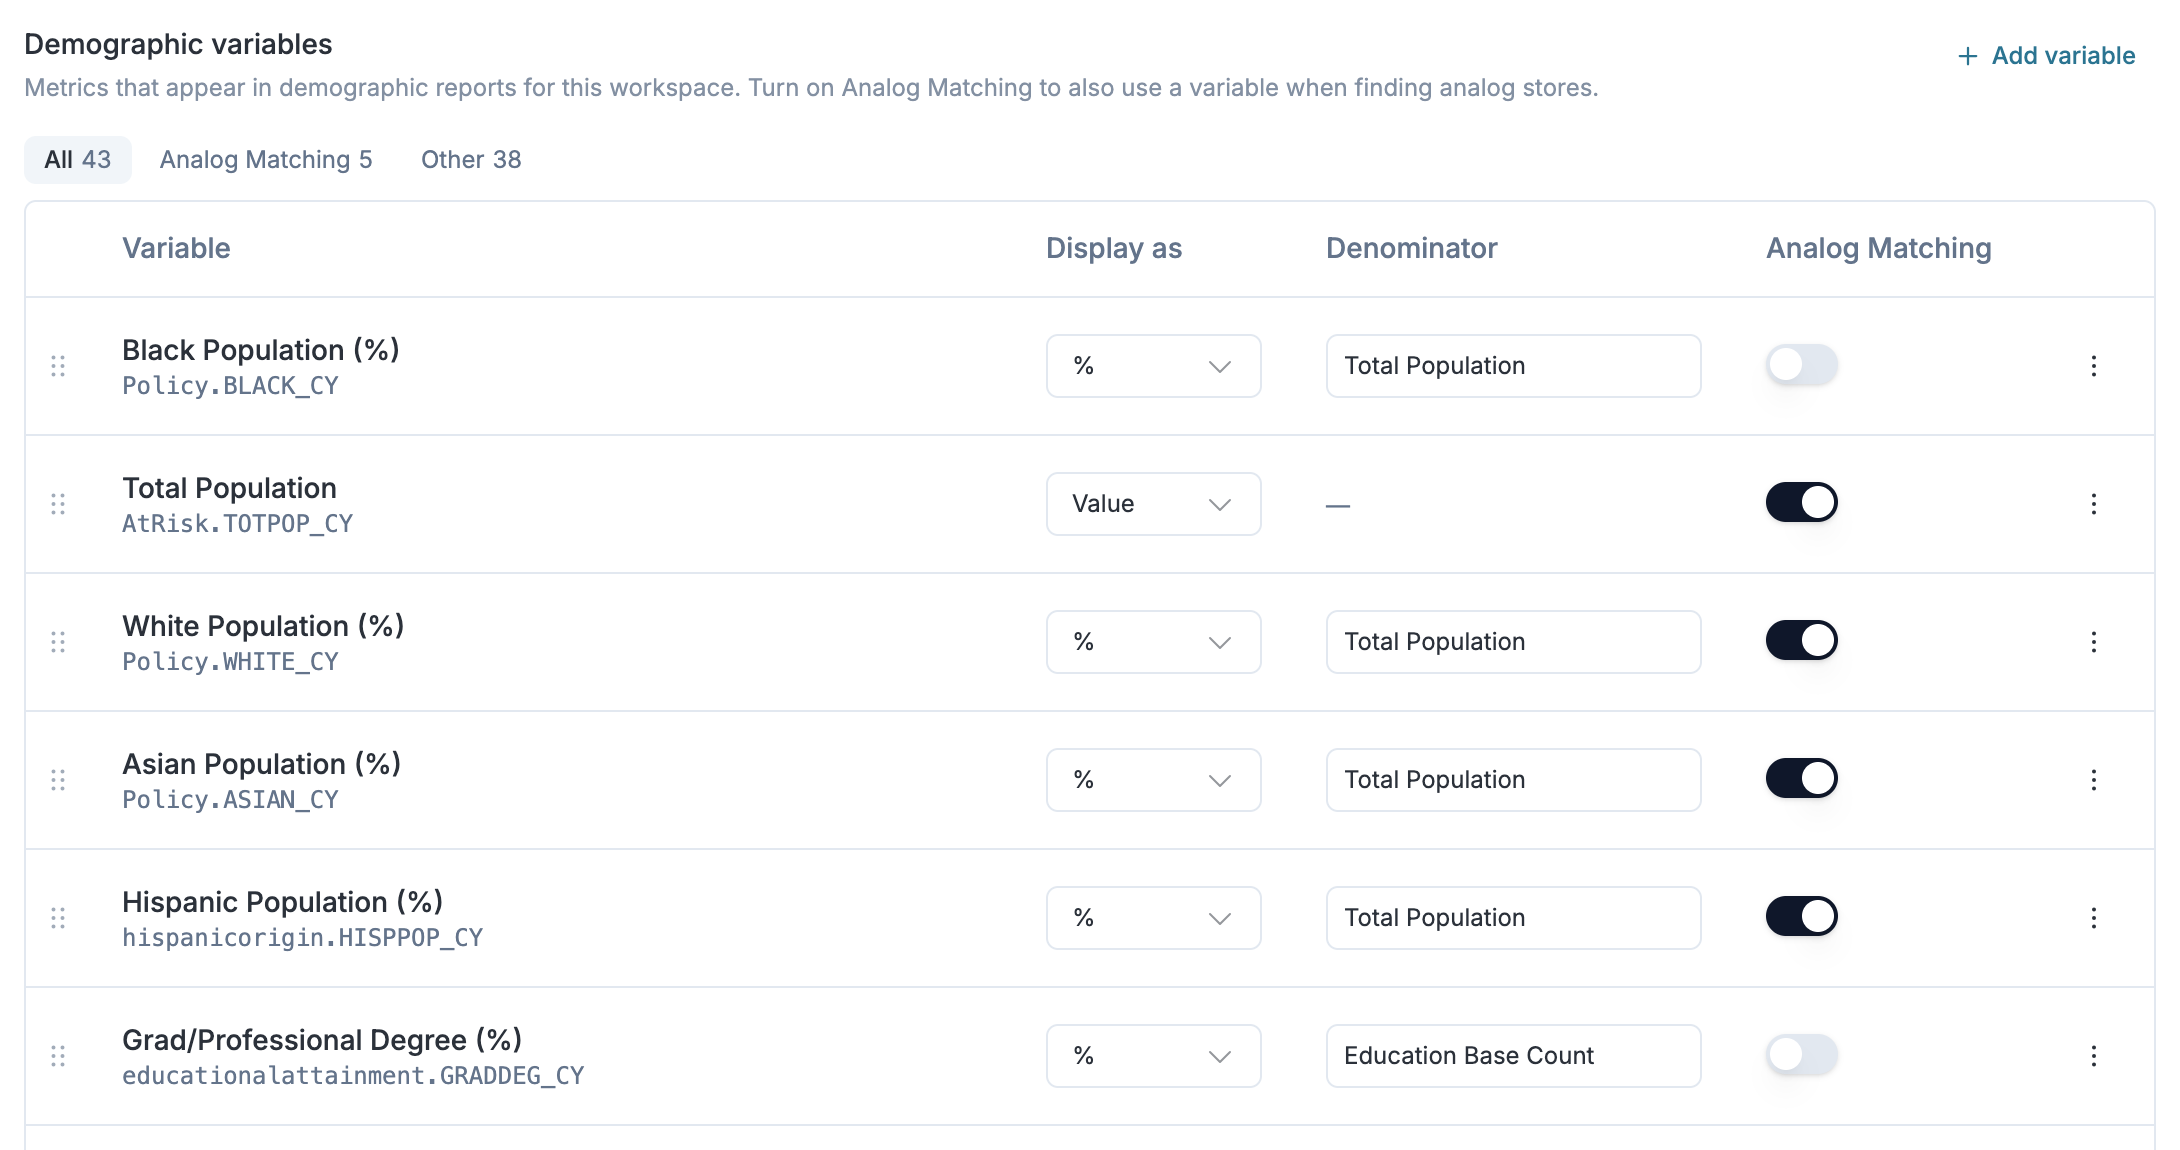
The demographic variables list is the set of metrics this workspace reports on. Every variable here appears in demographic reports for the workspace. Turn on **Analog Matching** for a variable and it's also used to find analog stores. You add, edit, reorder, and remove variables directly in this section.
Each row shows the variable's name with its ESRI code beneath it, plus three controls:
* **Display as** — **Value** for a raw count, or **%** for a share of a denominator
* **Denominator** — the variable the percentage is based on. Only percentage rows have one
* **Analog Matching** — turn on to also use this variable when finding analog stores
Drag a row by the handle on its left to reorder the list. To drop a variable, open its **three-dot menu** and select **Remove**. Changes save as you make them, so there's no separate save step.
The **All**, **Analog Matching**, and **Other** filters above the table narrow the list. Each one carries a count.
#### Adding a Variable
Click **+ Add variable** to open the picker. Search by name or code, or browse the collapsed category groups. Variables already on your list show an **Already added** badge and can't be picked twice.
#### Percentages and Denominators
Switching a variable to **%** leaves its **Denominator** cell reading **Choose…**, highlighted in amber until you pick one. Click the cell to open the picker, which highlights a **Common denominators** section of the bases used most often. A variable renders as a percentage only once it has a denominator. Switching back to **Value** clears the denominator.
{% hint style="warning" %}
Keep at least one variable on **Analog Matching**. With none turned on, there's nothing to match against and analogs can't be found.
{% endhint %}
#### Where Your List Appears
* The **Workspace Defaults** tab of the [demographics modal](/data-and-analytics/demographics.md#workspace-defaults-tab), in the order you set here
* The **Demographics** section of a store's detail panel
* Analog matching, and the **Matching variables** group in the analog comparison table
* PDF and Excel exports, as a **Workspace Defaults** page and category
* The [GrowthFactor Agent](/study/growthfactor-agent.md), which reads the active workspace's list
{% hint style="info" %}
Reference the [ESRI Data Browser](https://la.arcgis.com/databrowser-v2/index.html) for code documentation. If a variable you need isn't in the catalog, click **request a new variable** below the table to send a request to the GrowthFactor team.
{% endhint %}
***
## Members Tab
The Members tab lists everyone with a role on the selected workspace. Use it to invite new members, change roles, or remove access.
The list shows each member's email, name, role, workspace, and status. Use the search box to filter by name or email.
* **+ Add member** — invite an existing org user or send an invite to a new email
* **Three-dot action menu** — change a member's role (Viewer, Member, Admin) on this workspace, or remove them
See [Members](/getting-started/members.md) for full details on org-level vs. workspace-level roles, and the [Access vs. Membership](/getting-started/workspaces.md#access-vs-membership) distinction.
***
## Resources Tab
The Resources tab lists the resources owned by this workspace, grouped by type. Use it to bulk-move (or, for custom layers, copy) resources to another workspace. Deals and Sites show **Address**, **City**, and **State** columns; other resource types show a **Type** column instead.
1. Use the **type dropdown** to switch between Deals, Sites, Shared Maps, Custom Layers, and Files
2. Use the **search box** to filter the list. For Deals and Sites, search also matches address, city, and state; for other resource types it matches only the name
3. Check the items you want to move (or check the header checkbox to select all)
4. Choose a destination workspace and confirm
{% hint style="info" %}
**Custom Layers are copied** when you transfer them — a copy is created in the destination and the original stays in the source. **Files, deals, sites, and shared maps are moved** — they're removed from the source. To duplicate a non-copyable resource, move a copy after the transfer.
{% endhint %}
***
## Logo Tab
The Logo tab manages a single workspace logo that appears in two places: on **site pins** across the map (replacing the workspace's initials) and in the **header of your public deal dropbox page**. Upload it once and it shows up in both. By default, site pins display the workspace color with the workspace's initials overlaid.
### Uploading a logo
1. Click **Upload logo** (or **Replace logo** if one already exists)
2. Select a **PNG, SVG, or JPEG** file under **512 KB**
3. To remove it and revert site pins to initials, click **Remove**
{% hint style="info" %}
Square images centered on a white background work best. Only one logo is kept per workspace; uploading a new image automatically replaces the previous one.
{% endhint %}
***
## Custom Evaluators Tab
The Custom Evaluators tab is where you write your own evaluator agents. Each one scores a location against criteria you define, with access to the site data you give it. One evaluator per workspace can be the default, which is the one a location is evaluated with. See [Custom Evaluators](/data-and-analytics/custom-evaluators.md) for the full walkthrough of writing, running, and reviewing them.
***
## Site Score Tab
The Site Score tab controls how the [GrowthFactor Score](/data-and-analytics/growthfactor-score.md) is generated for this workspace.
{% hint style="info" %}
Site Score is being replaced by [Custom Evaluators](/data-and-analytics/custom-evaluators.md), which score a location against criteria you write yourself. Where you have both, this tab carries a **Deprecated** label.
{% endhint %}
### Workspace Context
A short description of your brand, target customer, and strategic priorities that the AI uses when evaluating sites. A clear context helps the AI generate more relevant, calibrated scores. Edit it directly in the textarea.
### Lenses
Lenses are the scoring dimensions that make up the GrowthFactor Score. Each lens row shows its name, a **type** badge (e.g., "AI"), an optional **weight** badge when the weight isn't 1× (e.g., "2×"), a short description, and badges for any connected data sources. Each row has three controls:
* **Toggle** — enable or disable the lens for this workspace
* **Pencil icon** — edit the lens name, description, weight, and connected data sources
* **Trash icon** — remove the lens
Click **+ Create lens** to add a new lens. Each lens can be weighted to reflect what matters most to your concept — if one or two dimensions are more important, increase their weight so they contribute more to the overall score. Lenses can also be connected to specific data sources (demographics, nearby businesses, cannibalization analysis, analog stores) so the AI grounds its evaluation in real data.
***
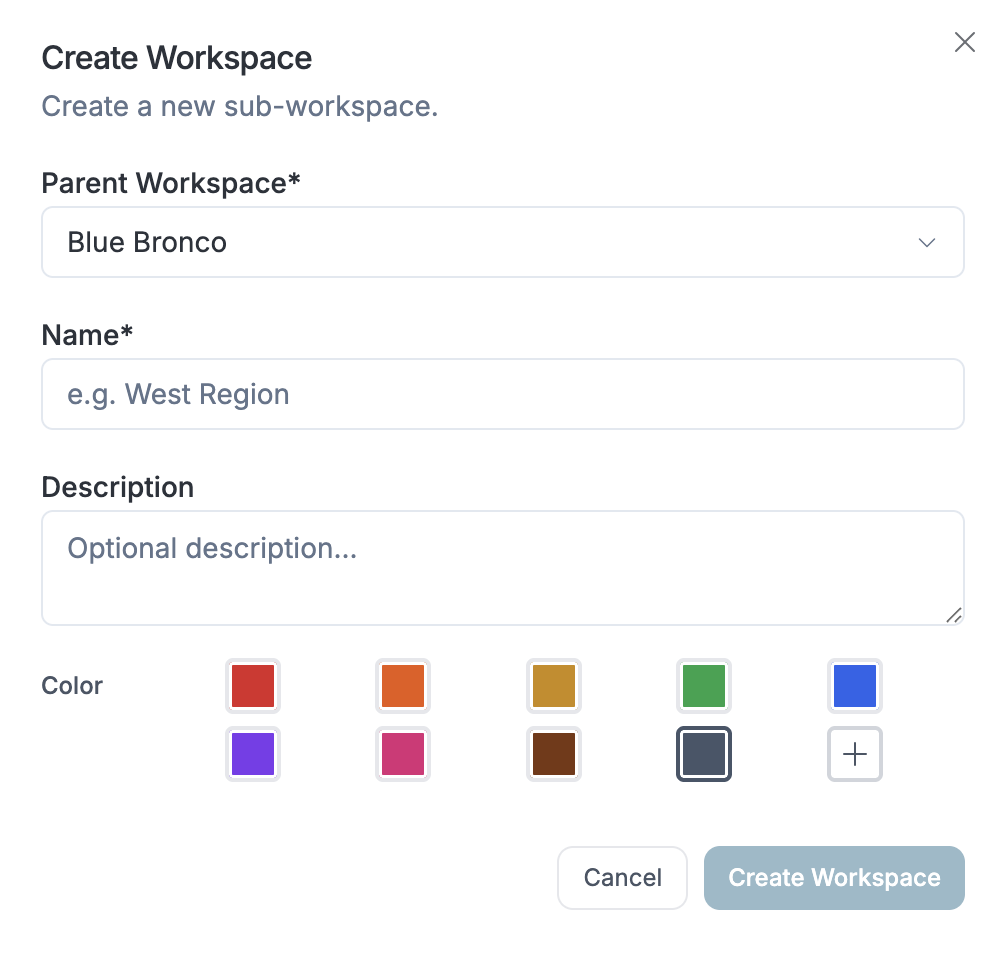
## Creating a Sub-Workspace
To add a child workspace from inside Workspace Settings:
1. Open Workspace Settings (workspace switcher → **Settings**)
2. Either click **+ Create sub-workspace** in the top right of the right pane, or click the **+** button next to "Workspaces" in the left tree
3. Confirm or change the **Parent Workspace** in the dropdown
4. Enter a **Name** (must be unique among siblings)
5. Optionally add a **Description**
6. Choose a **Color** from the presets or use a custom hex
7. Click **Create Workspace**
***
## Requesting Model Changes
Change the demographic variables that drive demographic reports and analog matching yourself, in the Defaults tab's [Demographic Variables](#demographic-variables) section. Add, remove, reorder, and toggle **Analog Matching** on any variable.
If a variable you need isn't in the ESRI catalog, click **request a new variable** in that section. Describe the variable you want and submit. The GrowthFactor team reviews the request and follows up.
For broader model work — building segmented models for different store formats, regions, or concepts — contact your GrowthFactor team at .
***
## Related Features
* [Workspaces](/getting-started/workspaces.md) — the workspace tree, switcher, and access vs. membership
* [Members](/getting-started/members.md) — org-level roles and the Members page
* [Custom Evaluators](/data-and-analytics/custom-evaluators.md) — writing and running your own evaluator agents
* [GrowthFactor Score](/data-and-analytics/growthfactor-score.md) — how scores are generated
---
# Agent Instructions
This documentation is published with GitBook. GitBook is the documentation platform designed so that both humans and AI agents can read, navigate, and reason over technical content effectively. Learn more at gitbook.com.
## Querying This Documentation
If you need additional information that is not directly available in this page, you can query the documentation dynamically by asking a question.
Perform an HTTP GET request on the current page URL with the `ask` query parameter, and the optional `goal` query parameter:
```
GET https://docs.growthfactor.ai/getting-started/workspace-settings.md?ask=&goal=
```
`ask` is the immediate question: it should be specific, self-contained, and written in natural language.
`goal` is optional and describes the broader end goal you are ultimately trying to accomplish on behalf of the user. GitBook uses it to tailor the answer towards what is most useful for that goal.
The response will contain a direct answer to the question and relevant excerpts and sources from the documentation.
Use this mechanism when the answer is not explicitly present in the current page, you need clarification or additional context, or you want to retrieve related documentation sections.